AC SEER Rating Explained

Every Texas, homeowner wants their house to be as energy-efficient, especially during the grueling summer months when most people use their air conditioners around the clock. Here is the key to keeping your energy bills down while still remaining comfortable in the summer heat with an energy-efficient air conditioning unit. Thinking about upgrading your air conditioner. Well, there are several things you should know before buying a new unit. There are a lot of parts that go into figuring out and understanding what a good SEER rating is for your home or business.

ac sear ratings explained

Home Air Conditioner Seer Ratings Explained – What is SEER Rating?

SEER stands for the seasonal energy efficiency ratio (SEER). The SEER rating is based on the amount of energy it consumes compared to its cooling output through the cooling seasons. In other words, the SEER measures your air conditioning and heat pump cooling efficiency. When you purchase a new air conditioning unit, it comes with a SEER Rating, which indicates the energy efficiency of a particular air conditioning unit. You can find this SEER rating, it is a number prominently displayed on the bright yellow Energy Guide sticker on the side of all air conditioners and other HVAC equipment.

According to the requirements by the U.S. Department of Energy, sets the energy-efficiency standards for HVAC equipment that manufacturers must meet. In Texas, your air conditioning unit must have, at minimum, a SEER rating of 14, to a maximum of 21 or 25 SEER rating. The higher the SEER rating, the more energy efficient the unit is, and the more money you can expect to save by running it. Generally, the 14 SEER units are a good SEER rating for most people…these AC units are considered the work-horses; rugged, tough, and most importantly, reliable in any home or business.

When you’re looking into a new AC unit, there are several choices between several SEER ratings. If you just look at the SEER rating on the yellow sticker, you may be tempted to buy the highest SEER system and be done with it. If you are not on a budget, then you have that option, although it’s not really cost-effective. When determining what SEER rating is best for you and your home, it’s better to do a cost analysis of how much money you will save with a higher-efficiency system compared to the upfront cost. A good rule of thumb, a good SEER rating is the highest you can afford while still being cost-effective.

It is important to speak with your Elite Heating and Air Conditioning HVAC technician and make sure that you’re getting the best unit for your home?

The efficiency of your system can also depend on the size of your home, the external climate, the need for insulation, the kind of current ductwork and other variables to a properly functioning unit. Also, keep in mind, the square footage that you’re intending to cool because you will need a unit that’s sized to match your home or business needs. Buying an air conditioning unit that’s too large can be just as bad as purchasing one that’s too small. So, it’s important to ensure that you choose an air conditioner with the right SEER rating. For example, people living in Austin, Texas, which has very hot summers, would need more AC output for their square footage then somebody living in Montana.

Still on the fence…..?

Think about this, the more cooling or heating a system puts out for each unit of energy it consumes, this means the unit will receive a higher rating. Thus it is most likely your AC unit is the most energy consuming appliance in your home. So, the higher the efficiency rating of your system, the less energy it will consume, this means lower utility bill costs for your home or business and less of an impact on the environment. Meanwhile, being energy efficient and saving you money over a period of time.

To get the most out of your system, make sure that your home doesn’t have any issues that could impact the efficiency of your new air conditioning unit. Make sure a professional HVAC technician to examine your ductwork. These ducts can become damaged over time and develop air leaks, which lowers the efficiency of your AC unit. You will need to have your ductwork sealed and have more insulation installed to help with the efficiency savings of your unit.

When AC units perform inefficiently, they cycle on and off quickly. This is a problem, we see this with over-sized installed AC units. The SEER ratings assume that the air conditioner will be used in an appropriately sized house and experience decent run times.

You will need to pay more upfront if you want an air conditioning unit with a higher SEER rating. However, you’ll save a lot of money by lowering your energy bills over the long-term. But, before you purchase a new AC unit, think about if you’re not expecting to be in the home for much longer, you may not want to spend as much money on a new AC unit, although a better unit can typically increases the resale value.

However, you are in luck, Elite Heating and Air Conditioning has financing available. Also, ask us about any specials, offers, extra incentives, manufacturer specials, tax credits, or rebates. Usually, utility companies will often compensate homeowners to install high-efficiency systems, which can help save you some money on cooling your home. While the SEER rating is important, it’s only the first step in having an efficient system.

If you’re still unsure about the effect of SEER rating on your home’s cooling system, give Elite Heating and Air Conditioning a call at (512) 637-4237. Our representatives and technicians would love to talk to you and offer assistance in any way on SEER ratings and a new AC unit for your home or business.
Austin Pets Alive: Austin, TX AC Replacement

We recently replaced an air conditioner for Austin Pets Alive.  Here are some photographs from behind the scenes.

Photography by Austin SpotOn photography.


AC Repair: A Guide To Your AC Repair

Austin, TX home AC repair

Did you realize your AC unit requires regular HVAC repair and maintenance? When your air conditioner stops cooling your house properly, it’s often an unexpected, out-of-pocket expense and no fun for homeowners to deal with. All year long, Texas weather can be relentless on your HVAC system. Keeping your air conditioner maintained, you will not only save money on energy, but you will also extend the lifespan of your HVAC system. 

It’s important to know that you have an AC system you can depend on. 

So, first……before calling a technician, you will want to start with the following troubleshooting tips (in no particular order):

  • Checking The Thermostat – It could be one of your family members, which may have changed the setting on your thermostat.
  • Try Turning on the AC’s Fan – If it starts the blower is getting power, so it could be a problem with the thermostat or bigger issue with the AC unit. If it does not start, there may be an issue with the blower.
  • Checking The Power – Sometimes it may be a tripped circuit or blown fuse. Reset connection or change fuse. 
  • Checking The Filter – If your air filter is dirty or clogged, this could cause your AC unit to malfunction and may need to be professionally unclogged. 

If none of the options above work, then one of Elite’s Heating and Air Conditioning trained technicians will be able to diagnose the problem and fix your air conditioner. 

Here are some other common reasons for calling an Elite licensed technician for AC repairs: 

Refrigerant Issues: Refrigerant is a common AC repair problem. The gas in the air conditioning system is sometimes referred to as Freon, which is a generic term for the class of AC refrigerants or coolants typically used. This is essential for cooling the air that blows out of your air conditioner. 

  • Low Refrigerant – At times, this may need to be replaced or topped off, which your HVAC professional will supply during the service call.
  • Refrigerant Leak – You may have a leak if you hear strange noises, notice your AC’s cooling output is decreasing, hear a hissing sound, evaporator coils are frozen, or you see dirt in the AC lines. When it comes to detecting and repairing a Freon leak, well this is a larger issue with an AC system. These leaks can get worse over time and should be dealt with as soon as possible. Depending on where the leak is located, repairs can cost between hundreds and thousands of dollars. 

For those of you that are environmentally aware, if the leak is outside, this Freon leak can contribute to depleting the ozone layer. If the leak is inside your home it can affect your family’s health by getting into the airflow. 

FYI … adding more Freon to your air conditioner will not make this problem go away. You will want to make sure to get any leaks fixed as quickly as possible. 

Clogged Drain Issue: If the water line from the condenser becomes clogged, or if you start to have water leaks, it can become costly. Elite technicians will find the cause of the problem, clear the clog in the condenser, and pour a cleaning solution down the drain line to further flush the system clear. 

Broken Compressor Fan or Frozen Condenser Coils: The AC’s outside unit is where you will find the compressor, fan, and condenser coils. These components work to release heat from the air, transferring it out of your home to produce that cool, enjoyable indoor climate. When the outdoor fan isn’t working correctly, the heat transfer process is hindered. Not only will this prevent your AC from adequately cooling your home, a broken fan can cause the system’s compressor to overheat. This overheating can also cause damage to the compressor itself, requiring a costly compressor replacement. Poor airflow through your cooling system can cause ice to form on the coils.

If you think you have any of these AC repair issues, contact Elite Heating and Air Conditioning today. One of our skilled HVAC technicians can diagnose the problem and offer solutions that will fit right into your budget.

When Should You Replace Your AC System:

Typically, your AC should be replaced every 10 years and in some cases your AC system can last longer. But if you’re giving your AC a run for its money and not properly maintaining it, it could be sooner. These systems break down sooner because they work much harder than they are supposed to. 

HVAC systems that are too old are just plain unreliable, and have a tendency to break down. This causes them to use more energy than they should and can cause your monthly utility bills to escalate. This is where you need to decide if you should keep shelling out money on repairs where you end up paying more to keep fixing it than if you go ahead and invest in a newer unit. The services your HVAC professional provides will depend on what part(s) of the HVAC unit that is broken and needs replaced.

At Elite Heating and Air Conditioning, technicians have combined their licensed skills with Trane’s specialized certification. We provide professionalism with a steady commitment when it comes to honest dealing and doing business with integrity in North and South Austin as well as West Lake Hills, Lakeway, Leander, Pflugerville, Round Rock and surrounding cities.We understand problems don’t always happen in the daylight hours. That’s why we are available 24 hours a day, 7 days a week.

We also make AC financing easy! Getting an HVAC replacement doesn’t have to be a burden on your finances. We create a plan that fits in your budget. And even if you have less than ideal credit, give us a call. We’ve been able to help people in many types of financial circumstances get the HVAC replacement they want with the financing they need. We have interest free financing up to five years and provide a 10 year parts and 2 year labor warranty. Learn more on how you can be enrolled into the Austin Energy Rebate Program. 

Call us now at (512) 637-4237

How To Clean AC Coil?

A road-map to coil cleaning!


          Most people get the oil in their car changed every few thousand miles or so, but rarely do people take the same care and consideration for a machine just as expensive and important, the air conditioner or heater in your home.

          Without it, especially in Texas, you’d be miserable most of the year–besides the heat, we saw snow in Austin last year (TWICE)! Just like oil changes and regular maintenance are essential to keeping a vehicle running properly, the same is true for the a/c and furnace systems in your home. There are many things you can do on your own to help maintain the longevity of your HVAC system, that you can read about here.

 Everyday we see units like the one on the left: Difference between a clean condensing unit and a dirty one.

Replacing them with units like the one on the right.

          We’re not saying with just this service you’re safe from all potential problems, but with regular maintenance and cleanings you could be saving yourself a lot of time, money, and energy from having to worry about it in the middle of July!


What and where is my condenser coil?


          The condenser coils are located on the outside of your home on the condensing unit. They’re what allows air to move from the gas of a refrigerant to the cool air you feel in your home. Over time, dirt and debris can clog the coils. This causes your unit to use more energy while simultaneously reducing the efficiency and ability to work properly.


What exactly am I looking for?


          Keep an eye out for anything that may be obstructing the unit. This can include grass and weeds, as well as tree branches, rocks, sand/dirt, toys, or even trash/debris that may have strayed near the system. All of these things can find their way onto those coils and obstruct air flow. Keeping the system from clogging up is the easiest way to prevent some major issues with your condensing unit.


          If you have taken the necessary steps like changing your filter, keeping your condensing unit clear of obstructions, and implemented a bi-annual maintenance check and tune up with Elite you will be better off than a lot of homeowners who weren’t so proactive!

Get a Tune-Up!

What is a ‘manual J’ and how does it affect your home’s comfort and energy efficiency?


If you are searching for a new HVAC system you may hear the term manual J, or at least you may see the term in your online research. However, surprisingly few contractors that come to your home to give you bid on your new HVAC system are actually performing a manual J.

What is a manual J?  

To simplify, it is a 3 dimensional computer program, that comes up with the CORRECT size of your A/C and heating system.  Be aware, a lot of contractors won’t do the little bit extra work  or use scary words like math, computers, and warranties –yikes..   However, it is the ONLY way to ensure your system is sized correctly.

How does it work?  

We input different the factors of your home into the program, these factors include; window sizes, window efficiency, insulation efficiency, roof and wall materials, the way the home faces, your climate area, the efficiency of your ductwork and the type of HVAC system you need. After this information is inputted in the computer program, it will tell us how big your air conditioner and heating system should be. In some cases it will also help us realize that a duct system might not be working well, or leaking, and that may need to be addressed as well.

Why does this matter?  

An HVAC system (furnace, coil, condenser and ductwork) all work together to provide you with comfort, cost you utility bills, and determine the longevity of your system.  The most common mistake contractors make when they don’t perform a manual J is to oversize your system. Why do they oversize it? Because you probably won’t call and complain until a couple years later when your warranty is up!

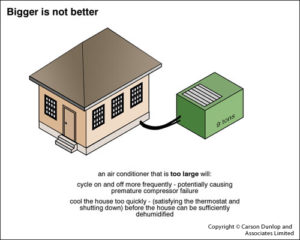
If you have a system that is too big you will be uncomfortable, paying too much in utility bills, and your system will not last as long. A properly sized air conditioner will run for long periods of time in the hot parts of the day and still keep your house cool and the humidity low. If the system is too large it will cool down the house really quickly and turn off, and then turn back on and cool off the house really quickly and repeat.  In Austin, Texas humidity and heat battle every day, we must get the humidity out of the house to make us comfortable.  Your system must run long enough to remove the humidity and only a properly sized system will run for long enough to accomplish this. Also turning on and off frequently as an oversized system will do, will ruin the system and your investment much more quickly.  Sort of like highway miles vs. city miles, the mechanical components of the system are at peace when they are running, but experience more wear and tear on the startup and shut down of the unit.  Especially in the spring and fall months where removing humidity is more important than cooling.

You will also be paying too much in utility bills if your system is not sized properly. If it is too large the frequent turning on and turning off of the system will cause it to constantly be running at its peak amperage. The startup of the unit has a large spike in the system electrical usage, as opposed to when it is running for several minutes the electrical usage levels out and becomes more efficient. It is a little bit counter intuitive that your system is more efficient when its running for a long time, but it is. Just like slamming on your gas on your Jaguar vs. cruising on the highway in your sweet Prius.  


bigger-not-betterIf a manual J is not done and a system is too small, the system will just not cool the house down to the temperature you would like it too be. This is the worst case for a contractor because you are sure to call back right away when it doesn’t cool you down to a reasonable temperature. That is why so many contractors oversize the systems and don’t do a manual J, they don’t want to go through the work of performing manual J and are scared of undersizing your system.  Bad contractors just oversize your system due to a lack of knowledge and to cut down on call backs, until your warranty is up, and it’s too late to do anything about it.  

Contractors are literally replacing systems that are 20 years old without checking that the size is correct.  These older system may be cooling your house to your satisfaction, but they probably also are working 3 X’s HARDER than they should because the components are dirty, old, and costing you much more in utility bills.  Because the system is old and dirty, it isn’t putting out the amount of cooling it is rated to be putting out. So while you may feel the size was correct of your old system, and tell your contractor to just put in the same size, you need to know, it isn’t going to be the same size. The newer system will be all shiny and clean and will deliver the correct amount of cooling it is rated at. Which may be way too much for your house because it isn’t slowed down by all the dirty and failing components.

If your contractor is not explaining this to you, find one that is up to date with the current requirements.  

Performing a manual J load calculation will help to ensure you will have a system that will last many years, will keep you cool, comfortable and at a lower cost.

Call Elite today at (512)637-4237 and find out how much a manual j could save you compared to your current unit!

DIY Repair Tips for Malfunctioning AC

Whether you’re looking for the best ac repair Austin has to offer or do-it-yourself repair tips for fixing a malfunctioning AC, you’ve come to the right place! Here in the Lone Star State, and particularly in south and central Texas, we enjoy many common pleasantries: temperate weather, a bevy of different landscapes throughout the state, rich culinary traditions, lauded southern hospitality, and a big blue open sky to gaze upon.

Sweltering temperatures are an expected side effect of our bright and sunny summers, but unfortunately the sticky, blazing hot weather isn’t relegated to the few summer months. A working air conditioner that blows cool refreshing air is an absolute must in these parts.

With just a few tools, a little know-how, and some patience you can repair some common AC issues yourself in half the time it would take to have your air conditioner professionally repaired.


Schedule a Pro Repair Visit Today!

Not quite ready to dive into DIY air conditioner issues? We’ve got you covered!

Schedule Now

Gather Helpful Tools

Before you start banging on your unit, turning screws, and tearing things apart, gather a few handy tools. Having the necessary tools for this DIY project all lined up will save you time, money, and frustration.

Locate or purchase the following tools:

  • Socket/ratchet set
  • Insulated screwdrivers
  • Adjustable wrench
  • Cordless drill/driver
  • Needle-nose pliers
  • Voltage tester
  • Nut driver
  • Multimeter

Now that you have your tools handy, let’s go over what is actually inside an air conditioning unit and what you’ll be looking at when you begin troubleshooting.

Anatomy of an AC Unit

There are two major parts of an air conditioner: a condensing unit that sits outside of your house and the evaporator coil, sometimes referred to as the A-coil, that sits in the plenum (air distribution box attached directly to the supply outlet of the HVAC equipment) of your furnace or air handler.

The A-coil contains refrigerant that picks up the heat from an inside space and pushes it out to the outdoor condensing unit. The condensing unit fan then blows outside air through the condensing coil to cool the air down.

Inside the condensing unit resides three potentially replaceable parts: the contactor, the start/run capacitor(s), and the condenser fan motor. The condensing unit also contains the compressor, but only a professional can replace that. There are no replaceable parts within the A-coil for you, the trusty DIY-er.

Signs Your AC Unit Is Not Working

AC units can behave in several different ways when they are not operating correctly. Before you can begin troubleshooting and fixing possible issues, you must determine the parameters, or working conditions, of your unit.

Is your AC:

  • Not working/running at all?
  • Not cooling well but running?
  • Dripping or leaking water?
  • Making odd or loud noises?
  • Continually running and won’t turn off?

Now that you have pinpointed some high level behavior of your AC unit, and you have some knowledge about the internal and external working parts, it’s time to begin exploring what might be going wrong and what is keeping your air conditioner from cooling efficiently.

There are a few areas or pieces of equipment that may prove to be the malfunctioning culprit, including:

  • Thermostat – The thermostat may be configured incorrectly or may be failing.
  • Filter – The filter may be clogged or too dirty to work properly.
  • Circuit breakers – The unit may not be receiving power via the electrical panel.
  • Condensers – The fan, within the compressor in the outside unit, should be running and should sound similar to a running refrigerator.
  • Coil – The coil may be frozen, preventing appropriate airflow.
  • Drains and Pans – These can become dirty and can impede proper draining.
  • Connect Technology – Your Nest, Curb, or similar technology hub, may not be operating correctly.
  • Air Registers – If several of the internal air registers (grates that cover the airflow point inside) are closed or clogged, the reduced airflow may have caused the A-coil to ice up and stop cooling.

Some air conditioner repairs should be handled by a qualified AC repair company. Below, we cover several ways you can DIY simple repairs and maintenance of your air conditioning unit yourself, but if you’re feeling overwhelmed or simply don’t have the time to DIY contact a professional.

DIY Fixes for Common AC Issues

The following DIY tactics are specific for each type of air conditioning problem mentioned. A little elbow grease, some cursory knowledge of the workings of a standard air conditioner, and expert-level tips and tricks will help you remedy common AC issues, or at the very least determine whether you should call in the professionals to finish the job.                                                  

AC Not Working/Running

When the thermostat in your house reaches the set point that signals the AC unit to begin cooling, but your AC doesn’t kick on or begin cooling:

  • Locate and check your main electrical panel and any other circuit panels for a blown fuse or tripped breaker. If you find that a breaker is tripped go ahead and reset it by flipping it off and then back on. If a fuse is blown, go ahead and replace it. A central AC unit should be on a dedicated 240-volt circuit.

    If the breaker continually trips, there is probably a short in the system somewhere. Contact an electrician to have them verify whether the fan motor, compressor, or capacitor is the source of the problem.
  • Make sure the power is on. Check the power switches in the furnace or air handler, and in the outside condenser, to ensure that power is on for the system. Also double-check the compressor’s 240-volt disconnect to confirm that the power hasn’t been shut off there either.
  • Ensure that the thermostat is set to COOL, and that the temperature setting is at least a few degrees below room temperature. If your thermostat isn’t popping on due to an incorrect setting, simply re-set your desired temp and HEAT/COOL setting and re-test.
  • Verify that your thermostat’s batteries are fresh and that all wires are connected properly. To do so, remove the thermostat cover, then pull the thermostat base straight off. Replace the batteries and check that the connections between the wires and their terminals haven’t been pinched out of place by the cover. Replace the cover and wait a few minutes, then try to switch on the AC system again.
  • Determine whether the thermostat is faulty. Open the thermostat and remove the wire from the Y terminal. Turn the power back on, and holding the wire by its plastic insulation only, touch the bare end to the R terminal and hold it there for 1-2 minutes. If the compressor starts, your thermostat is faulty and needs to be replaced. If the compressor does not start, turn the power back off and call an air conditioning repair company.
  • Check the compressor’s capacitor and wire connections. The capacitor in the compressor starts the condenser and the fan, so if the capacitor has failed the AC won’t run. Shut down all power to the unit and verify that it is off before proceeding. Remove the electrical cover of the unit, and using a digital multimeter set to “Capacitance” place one lead on the “Common” terminal and the other lead on one of the other two terminals. If the meter shows “OL” that means there is a short somewhere.

    See how to test an air conditioning condensing unit capacitor and wires:

    AC Not Cooling But Running

    Sometimes an air conditioner will be obviously running but no cool air, or just tepid air, is coming out through the vents. In this case, ensure that nothing is blocking or limiting the airflow in the air filters, registers, and compressor.

    To check blockage and airflow:

    • Clean or replace the filter. Remove the front door of the air handler cabinet and pull out the filter. If the filter is dirty, grimy, or caked with debris of any kind vacuum it and then soak it in a bucket of equal parts vinegar and water for a few hours to kill harmful bacteria, dirt, and allergens. Allow the filter to drain and then dry.

      If you notice any rips or snags, don’t even bother to clean the filter. Replace it, as continuing to use them when they are worn out will definitely limit efficiency.
    • Look for ice around the coils. If you notice that there is ice accumulation around the cools, close the unit up and turn the fan on. The ice will melt in a couple of hours. Ice around the coils is likely caused by reduced airflow due to soiled filters or coils, or a low refrigerant level (which is something that should be checked and recharged by a professional, like Elite Austin AC.)

    • Clean out the condensate drain. Air conditions create a lot of water because they remove moisture from the air as they work, and you can often see water pooling around the unit. Algae can block the drain pipe and cause the AC to stop working.


      See the instructions below for dealing with condensate problems (
    • Check the outdoor compressor. Clean the outdoor compressor, including the coils.

      If the compressor fan isn’t turning on when you set the thermostat to a temperature below room temperature look for an overload button or reset switch and reset it. If your AC unit does not employ this option, use a screwdriver or long stick to attempt to spin the fan blades clockwise. If the blades spin freely and the fan gives the unit enough boost to begin working then your capacitor is faulty and needs to be replaced.


      If cleaning the compressor coils and kickstarting the fan blades doesn’t work, have a qualified local air conditioning repair professional recharge the coolant in the unit.

    AC Dripping or Leaking Water

    In especially humid climates, like many areas of Texas, air conditioners can create gallons of water per day, which exits through a drain tube attached to the air handler. If water is dripping or puddling near the base of the air handler it may be leaking from the drain tube, something could be blocking the water flow, or the condensate pump could be malfunctioning.

    Some unit models have a safety float switch that will flip off the AC if the drain tube backs up, which is a definite sign that the drain tube should be replaced.

    To remedy dripping or leaking water:

    • Make sure the electric condensate pump is connected to a working electrical outlet. Then look to see if the drain tubing has come loose or is disconnected from the pump. If so, reconnect it. If the drain tube is clogged with algae use a wet-dry vacuum to suck all the water out of the tube.
    • Test the condensate pump. Pour water into the collector, which is turned on by a ball float that moves with the water level. The pump should start. If it is stuck, disconnect the pump and clean it out. If it’s old, broken, or worn, replace the condensate pump.

      If the pump runs but doesn’t empty out as it should, unscrew the check valve, loosen the ball float inside, and look for blocking or algae build-up. If dirty or clogged, remove it and blow it out or run a wire through the inside to clear the blockage.
    • If ice is blocking the tube, clean or change your AC filters ANCHOR LINK FOR ABOVE. If the air conditioner filters look fine and relatively clean then the AC’s refrigerant supply is likely too low. Have a professional recharge the unit.

    AC Unit is Noisy

    If your air conditioner is making a racket, the air handler, the outdoor compressor, or the ductwork could be to blame.

    Air Handler Making Noise

    The air handler sometimes makes a squealing, grinding, or buzzing noise. To alleviate the noisiness:

    • Check the connection between the belt and the motor. Most air handlers are equipped with direct-drive motors, but some older units are belt-driven. When you hear squealing sounds coming from the air handler that may mean that the belt is improperly aligned or in need of replacement. Refer to you owner’s manual for instructions on how to replace the belt.


      If your direct-drive blower is making squealing or grinding noises shut down the unit and contact an HVAC professional. The motor’s bearings may be worn down and need to be replaced.

      If your air handler is making a buzzing noise when you turn on the thermostat switch the thermostat HEAT/COOL toggle to OFF, and then switch the fan from AUTO to ON. The fan should begin running. If the air handler starts buzzing the fan relay or blower fan may need to be replaced.

    Outside Compressor Making Noise

    Likewise, the outside compressor may be emitting buzzing, humming, or grinding noises. To alleviate the noisiness:

    • If the AC compressor is buzzing the run capacitor may not be working. If that is the case, the motor will overheat when it tries to start, and a thermal overload switch may shut it off. Deftly poke a long screwdriver or stick through the outside unit grill and attempt to spin the fan clockwise. If it starts spinning and then stops after one cycle, the capacitor needs to be replaced.
    • If the AC compressor is humming when you turn the thermostat to the COOL setting the issue is likely the low voltage transformer for the unit. Contact a professional to troubleshoot or fix the transformer.
    • If the AC compressor is making a grinding noise the motor bearings may be worn out. Replace the motor.

    Ductwork Making Noise

    Heating and cooling ducts are typically metal and conduct noise very easily as the air handling unit helps to move air into the rooms inside. To eliminate ductwork noise:

    • Insert flexible insulation ductwork between the heating and cooling system and the ductwork. Have an HVAC professional complete this installation if needed.

    • If the ductwork is making a pinging or popping noise, locate the source of the sound along the duct and make a small dent into the sheet metal. This provides a more stable surface that is less likely to move as it heats and cools.

    AC Won’t Turn Off

    If your AC unit does not turn off when room temperature reaches the temperature set via the thermostat, the thermostat itself or the electrical system that runs the outside condensing unit may be the issue.

    To fix a continually running AC unit:

    • Check to see if the thermostat is displaying any values. If it shows a blank screen, or if the AC shuts off when you switch it to the HEAT setting, the thermostat is probably broken and needs to be replaced.
    • Remove the yellow low-voltage wire from the thermostat while the AC is running. If the unit turns off, the thermostat is broken or wired improperly. If no thermostat wires are cross-connected, buy and install a new thermostat.

      If the AC does not turn off when you remove the wire from the thermostat the outdoor run relay contacts may be stuck together or malfunctioning. Turn off the power to the furnace and condensing unit, disassemble the relay, and pry apart the contacts.

    Test Your DIY AC Fixes

    Air conditioning units and thermostats have built-in delay features, which can last up to 10 minutes, when they’ve been shut down and powered back up again. If you have an energy-saving device installed from your local power utility the unit could take even longer to reset. Be patient!

    If you’ve followed the DIY air conditioner repair steps noted above, have ensured that breakers and electrical panels are all turned on and receiving power, and have moved the thermostat to AC mode with a temperature below the current indoor temperature, and the unit doesn’t begin running after about 30 minutes it’s time to call a professional!

    Our do-it-yourself AC repair tips cover a lot of ground, and may provide the improvement you are seeking, but if you’re experiencing continuing AC issues don’t hesitate hire an expert.


    Gather Helpful Tools

    Anatomy of an AC Unit

    Signs Your AC Unit Is Not Working

    DIY Fixes for Common AC Issues

    AC Not Working/Running

    AC Not Cooling But Running

    AC Dripping or Leaking Water

    AC Unit is Noisy

    Air Handler Making Noise

    Outside Compressor Making Noise

    Ductwork Making Noise

    AC Won’t Turn Off

    Test Your DIY AC Fixes

Five Ways to Keep Cool and Save Money

We may not remember it, but there was a time when Texas residents didn’t use air conditioning to keep cool during the summer. Can you imagine doing that in the Austin Summer Heat? That’s exactly why we’ve put together these energy-saving tips!

Fortunately, we live in the modern era where you don’t have to completely forego the comforts of modern air conditioning in the summer, BUT if you want to save money on your utility bill while keeping cool, check out these 5 cost-effective tips!

Here are five ways to stay cool without turning up your air conditioning:

Read more